You want backyard steps that do more than just get you from point A to point B—you want them to show off your style, keep things safe, and maybe even spark a little envy.
Here are 15 front-step ideas that’ll help you pick out styles, materials, and clever touches that fit your yard, your wallet, and your personal vibe.
Build steps that look awesome and actually do their job.
Think of this as your step-up starter pack: from wood planters that double as steps, to LED-lit treads for nighttime snack runs, each idea gives you a way to make your backyard steps more fun and functional.
Forget guessing—mix and match these ideas for a space that’s safe, weather-ready, and totally you.
1. Install weather-resistant wooden steps with built-in planters to add life and charm
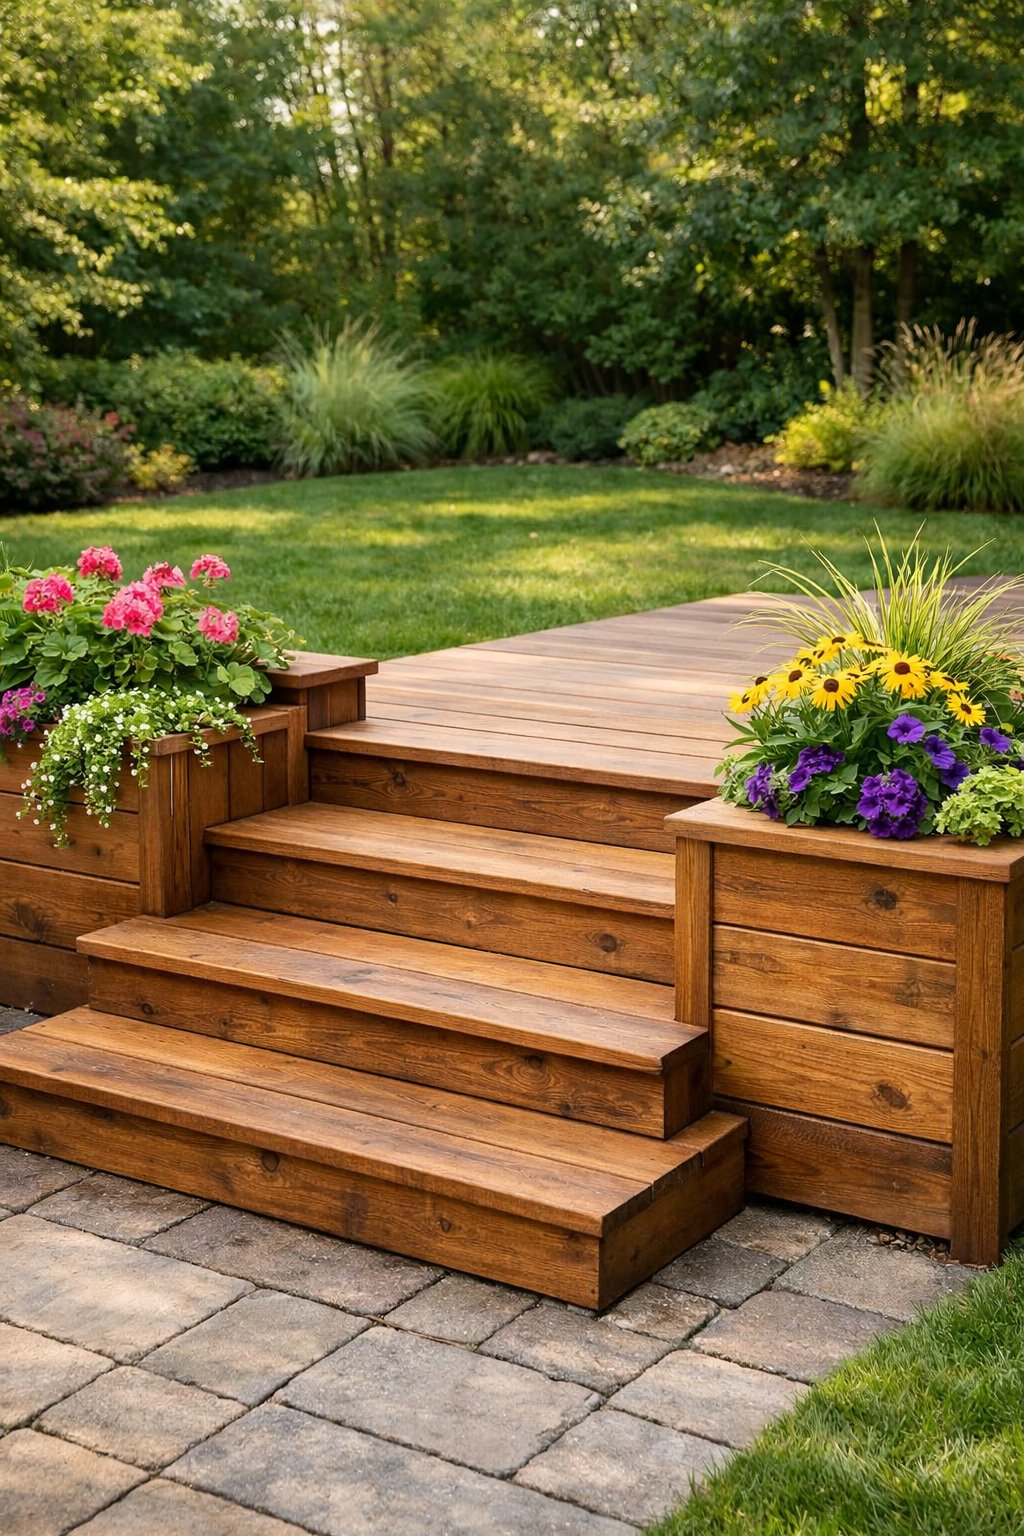
Let’s bust a myth: wooden steps don’t have to fall apart after one rainy spring.
If you go with treated wood or something naturally tough like cedar or redwood, your steps will stick around for years. Slap on a good sealant and give them a little TLC, and you’re golden.
Built-in planters break up the lines and bring color right up to your feet. I like to plant easy-going herbs or trailing flowers that spill over the edges for that “I woke up like this” look.
Line those planter boxes with something waterproof and poke a few drainage holes. That way, you keep your wood happy and your plants even happier.
Expert Tip From MrPlanter: “Cedar or composite wood is your friend—seal it every other year to keep moisture out. Stick with drought-tolerant herbs or succulents for a low-key, cheerful vibe.“
2. Create a winding stone step path with irregular slate for that natural, ‘who needs a lawn?’ vibe
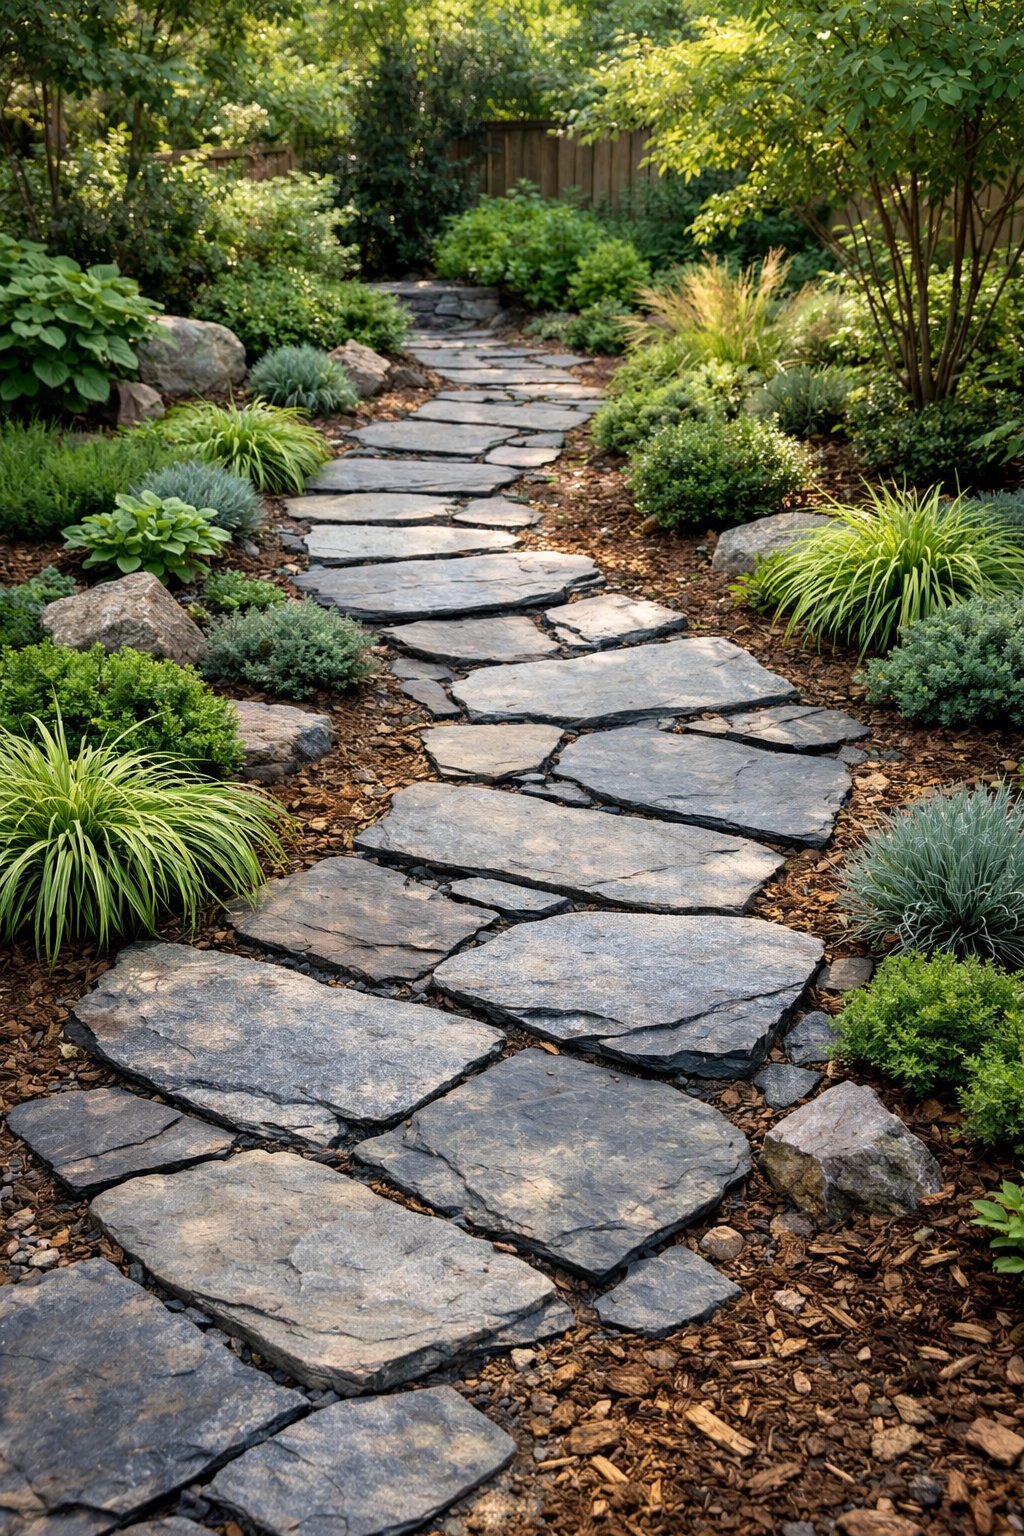
Here’s the scoop: you don’t need a perfect lawn for a gorgeous yard.
Pick out some irregular slate pieces and leave gaps for moss or creeping groundcover. Those odd shapes look like a storybook trail—way more relaxed than stiff, straight steps.
Let the path curve a bit to guide folks and hide any little bumps in your yard. Fill in between stones with gravel or sand for drainage and to keep things steady.
Mix big stepping stones with smaller chips for texture and an easy walk. Drop in some thyme or sedum in the cracks for a little scent and color.
Expert Tip From MrPlanter: “Make sure your stones sit flat—test before you set. You’ll thank yourself later with every sturdy step.”
3. Paint risers with bold, colorful geometric patterns—hello, art gallery for your feet!

Here’s a fun fact: a pop of color on the risers can totally change the mood of your yard.
You can go wild with triangles, chevrons, or just blocks of color—each step becomes its own little masterpiece.
Keep the actual step part neutral so your patterns really jump out and nobody slips. Use outdoor paint made for floors and add a clear non-slip coat so things stay bright and safe, even when it’s wet.
Try repeating a pattern that matches your garden colors. It looks intentional, not just loud, and you’ll get a happy little jolt every time you step outside.
Expert Tip From MrPlanter: “Test your colors on a scrap first to see how they look in real sunlight. Clean and prime those risers so your paint job actually lasts.“
4. Use stacked cedar logs as step risers for a rustic touch that screams cozy cabin in your backyard
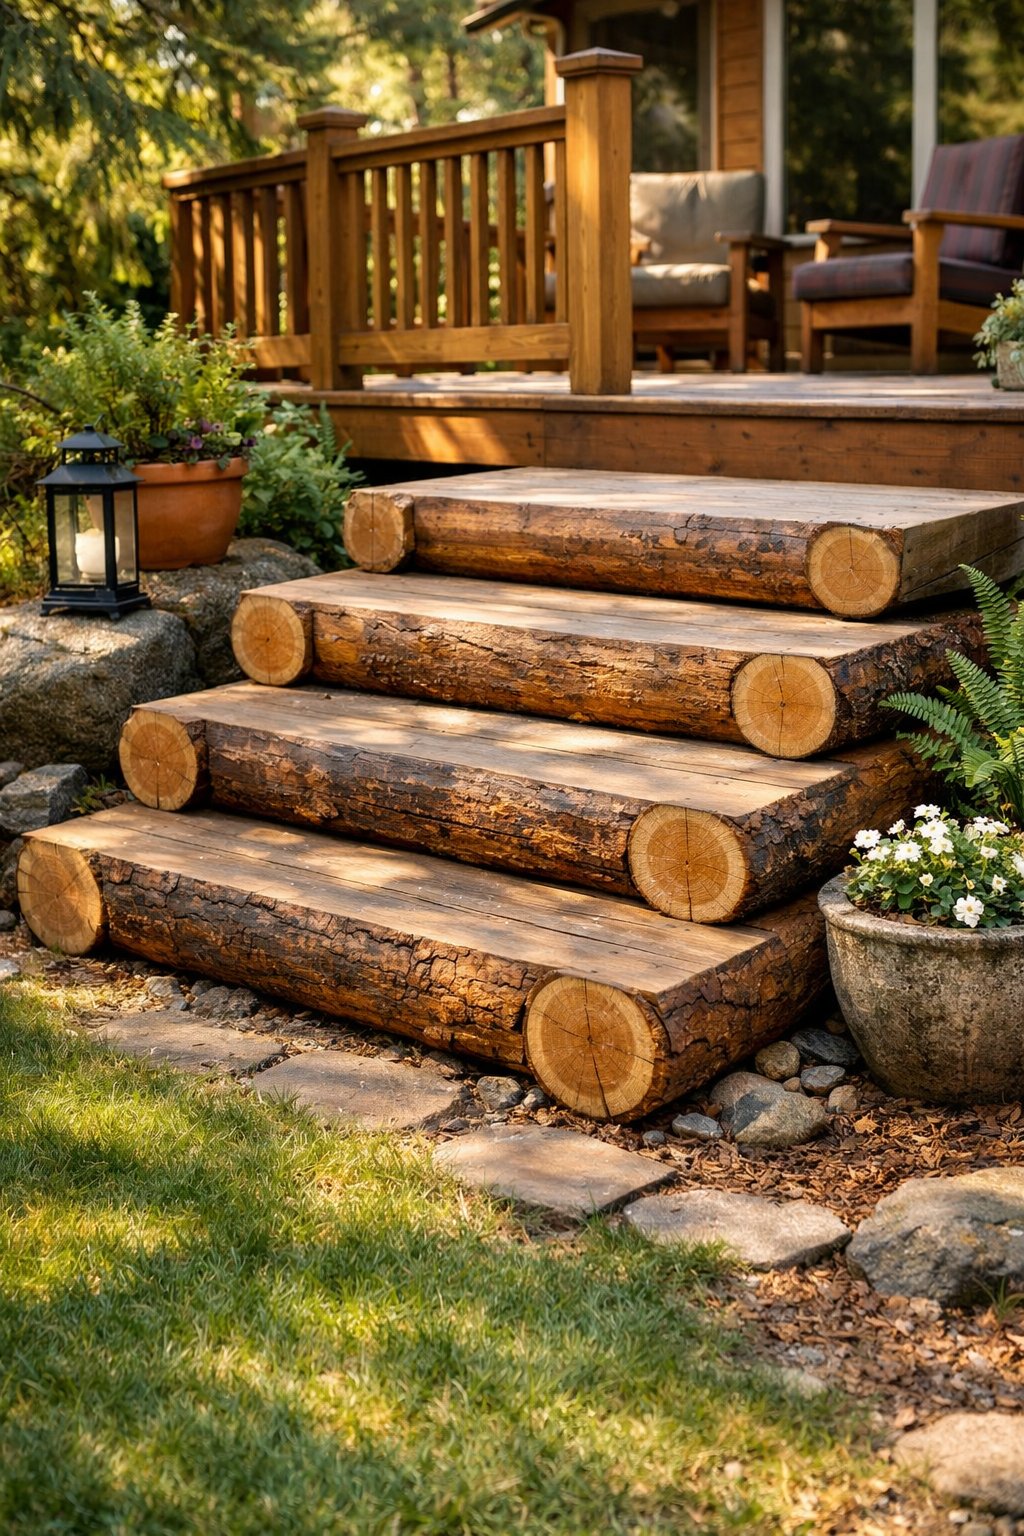
You don’t need a total overhaul to get that cabin-in-the-woods feel.
Stacked cedar logs make solid, warm-looking risers that just feel inviting. Pair them with stone or wide wood planks, and over time they’ll age to a cool silvery gray.
Cedar naturally shrugs off rot and bugs, so it’s a smart pick. Cut your logs to the same height and pack some gravel behind them for drainage. That keeps things sturdy and helps water move along.
You can leave the bark for a rough look, or peel it for something neater. Seal the wood if you want to keep the color richer and slow down the weathering.
Expert Tip From MrPlanter: “Go for pressure-treated or naturally tough cedar, and don’t skip drainage behind the logs. Hammer in landscape spikes or rebar to keep everything from wiggling.“
5. Embed LED strip lighting under each step for safe, nighttime ninja missions to the grill
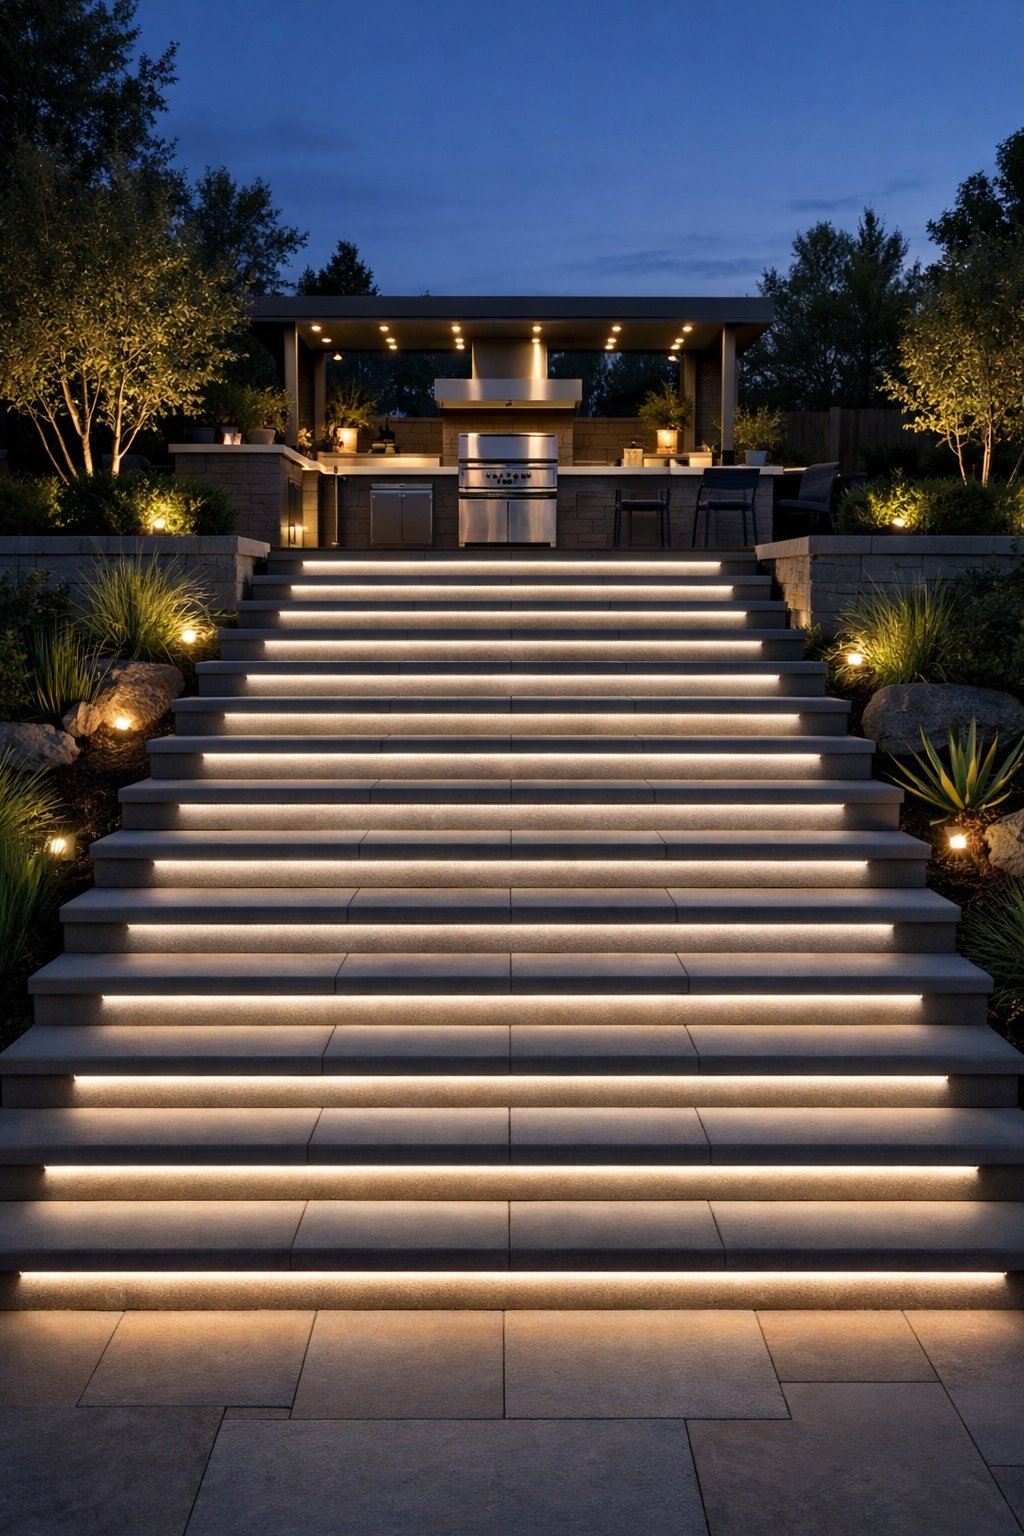
Ever tried carrying a burger and a spatula after dark, squinting at your steps? Yeah, it’s a little risky.
LED strips under each step light up the way so you don’t have to guess where you’re walking. You get a nice, even glow and no more shadowy surprises.
Pick weatherproof, low-voltage strips and tuck them under the edge of each step. Hide the wires in a groove or under the stringer to keep things tidy.
Clip them on or use waterproof adhesive, and grab a dimmable driver so you can keep it bright for parties or soft for late-night snacks. Add a motion sensor for hands-free magic.
Expert Tip From MrPlanter: “Look for IP65 or higher strips—they’ll actually last outside. Mount the lights toward the back of each step for less glare and smoother lighting.“
6. Cluster oversized terracotta pots with succulents and herbs on your steps, because green thumbs need to be seen
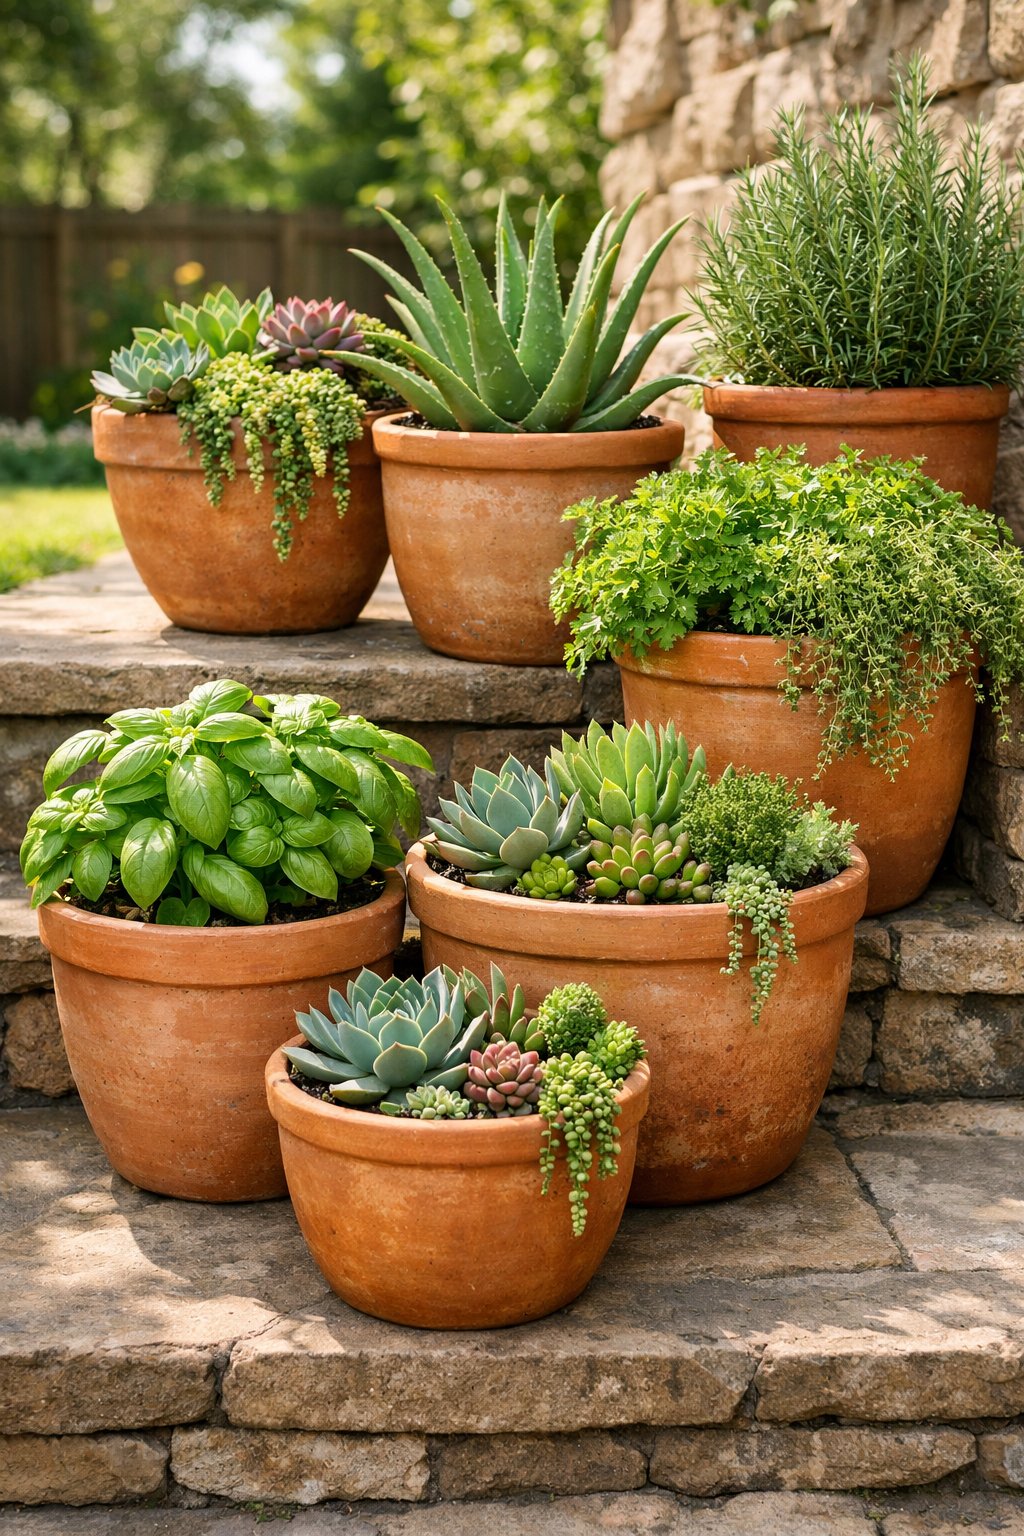
If you want a lively entry but don’t have space (or energy) for a garden overhaul, here’s a trick: cluster some big terracotta pots on the steps.
Terracotta lets plants breathe and keeps roots from getting soggy—especially good for succulents and herbs.
Mix up the pot sizes and heights for a relaxed, layered look. Put shallow bowls or smaller pots in front of the tall ones for more depth and a little extra charm. Stick with easy-care plants like rosemary, thyme, or whatever succulent you like best.
Use gritty, well-draining soil and toss in some gravel for good measure. Give your pots a spin every now and then so everybody gets some sun.
Expert Tip From MrPlanter: “Stick a saucer under each pot to catch water and save your steps. Group plants that like the same amount of water so you don’t drown your succulents.“
7. Construct floating concrete steps over a water feature to make guests feel like they’re walking on air (and fancy)
Surprising Fact: People remember a walk over water way more than they remember a patch of grass. Floating concrete steps? Now that’s a backyard flex.
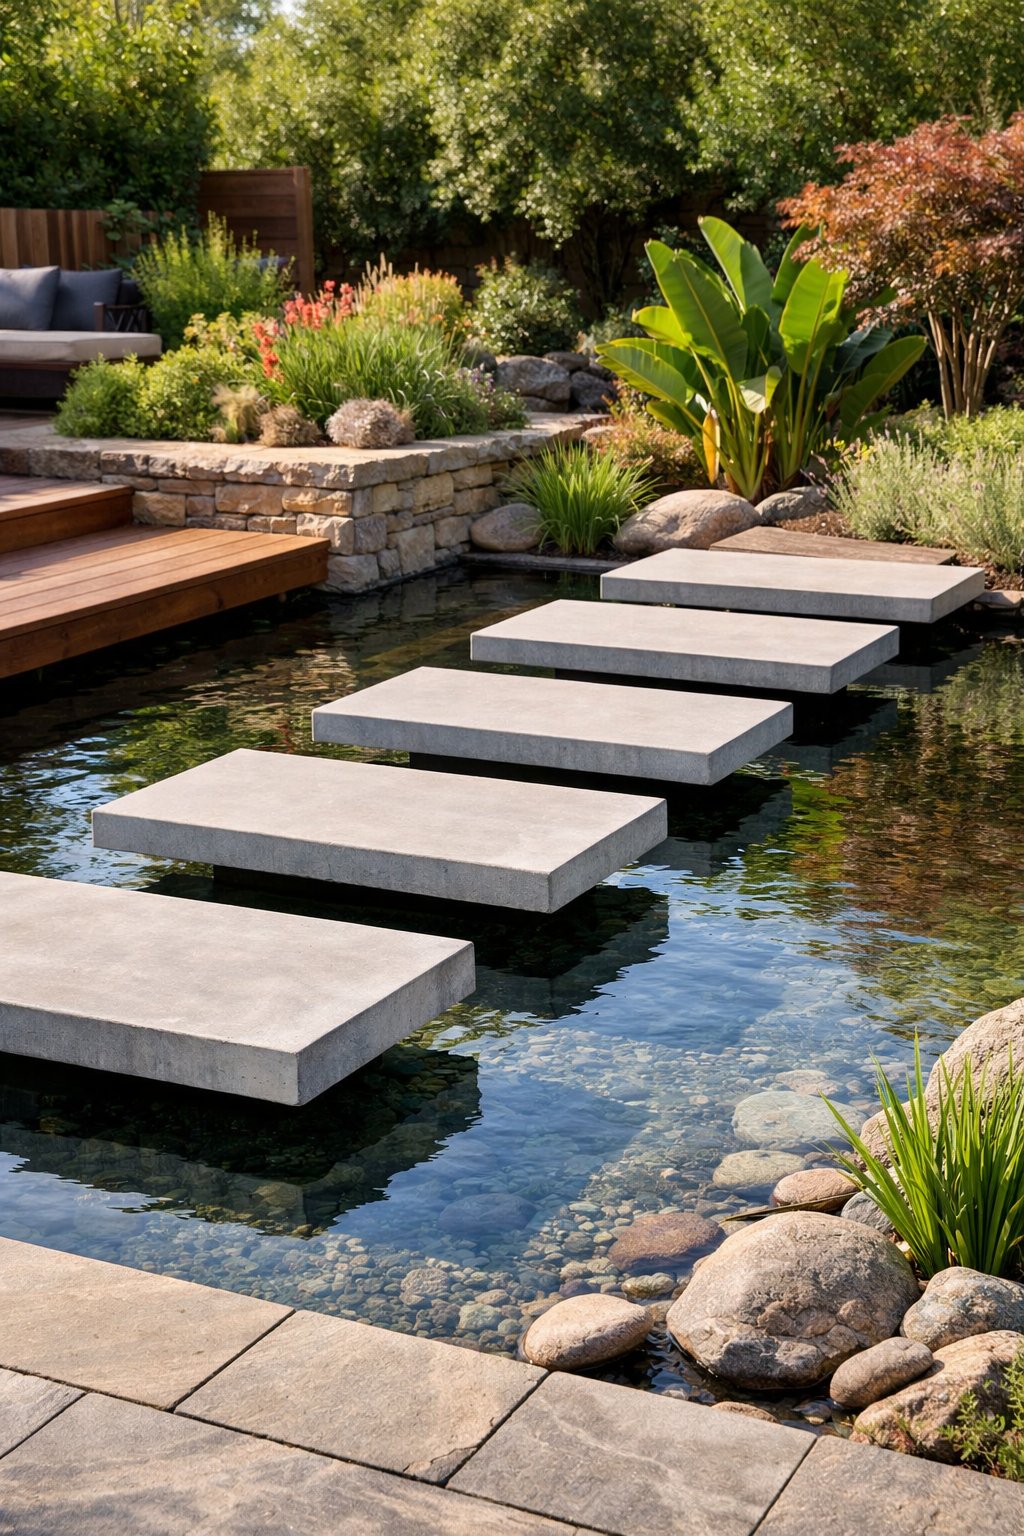
Thick concrete treads seem to float above a pond or stream when you hide the supports. You get a slick, modern look that feels a little bit magical.
Go with wide, slip-resistant treads so every step feels solid. Use steel pins or a hidden beam underneath, and seal the concrete so it shrugs off the weather.
Edge the water with soft grasses or groundcover to blur the lines and hide any hardware. Throw in some low lights along the water for extra drama after sundown.
Expert Tip From MrPlanter: Add anti-slip strips to each tread and test it out with wet shoes first. Give the fastenings a check every year to keep everything sturdy.
8. Add anti-slip bamboo stepping boards for eco-friendly style that doesn’t slide when you’re moonwalking
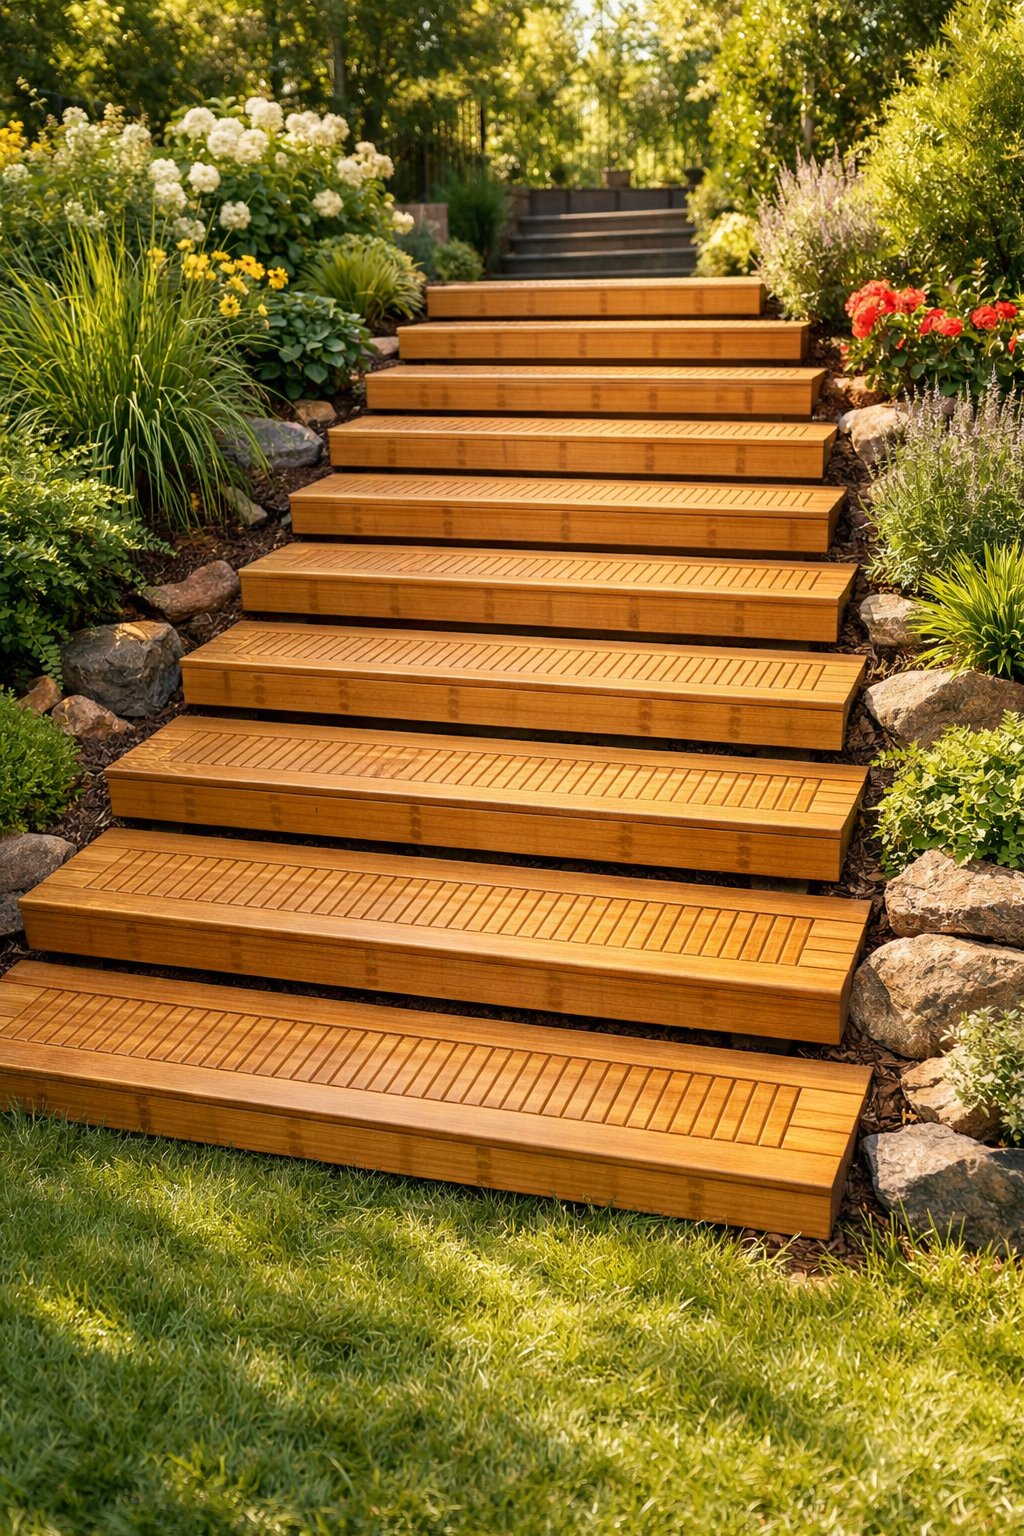
Let’s clear this up: bamboo isn’t just for looks—it’s grippy too.
You get a warm, modern vibe that works with all sorts of yard styles. Bamboo holds up outside if you seal it and keep it off soggy ground.
Pick boards with anti-slip finishes or textures so you can strut your stuff without worry. Go for treated edges or rubber feet if you’re putting them on a deck or pavers.
Bamboo grows back fast and doesn’t weigh a ton, so moving or installing it is a breeze. Match up the width and spacing with your step height for a smooth walk.
Expert Tip From MrPlanter: Seal those boards with marine-grade stuff to keep moisture out and stop warping. Pop some rubber pads underneath for extra grip and to protect your surfaces.
9. Install a wrought-iron railing with intricate scrollwork to give your backyard steps a magical fairy-tale feel
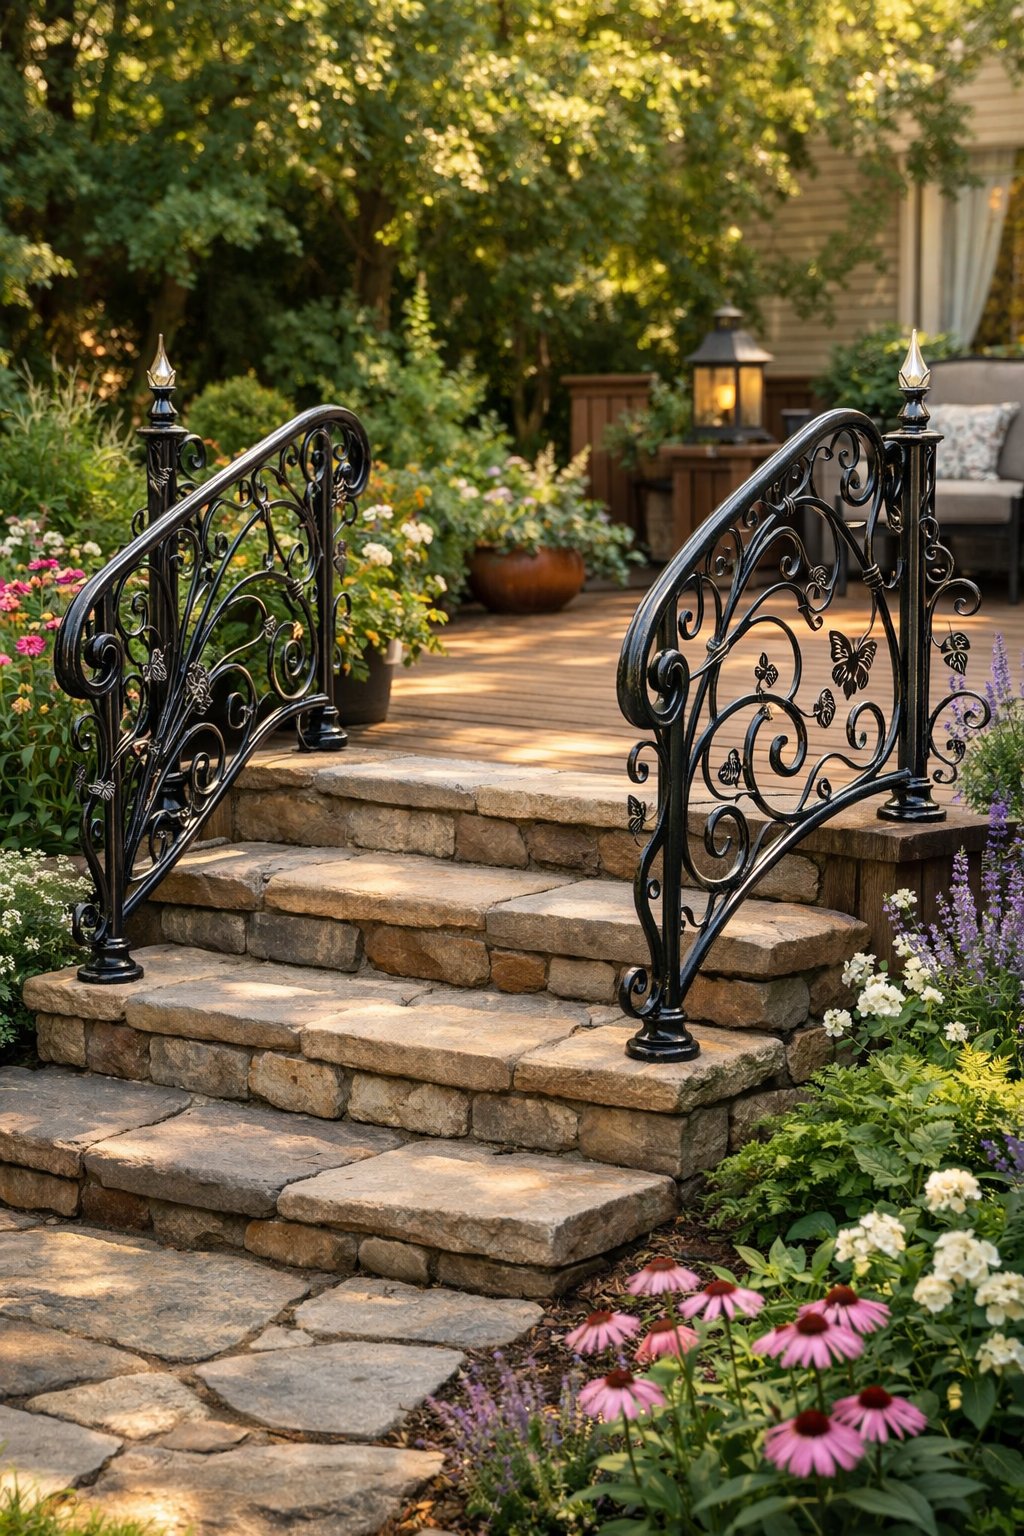
You don’t need a castle to get some storybook magic on your steps.
A wrought-iron railing with twisty scrolls adds old-school charm and keeps things safe at the same time.
The curves catch the light and make your plants pop, so your steps feel extra welcoming. Pair iron with wood or stone and you get a cozy, layered look that feels personal.
Pick a weather-tough finish so your railing stays cute through sun and rain. Little touches like this make a big difference without taking over your whole yard.
Expert Tip From MrPlanter: “Go for powder-coated finishes—they’re less work to keep up and the color holds. Keep your handrail around 34–38 inches for comfy, safe grabbing.”
10. Use recycled glass tiles on step risers for a shimmering effect—basically underwater vibes without getting wet
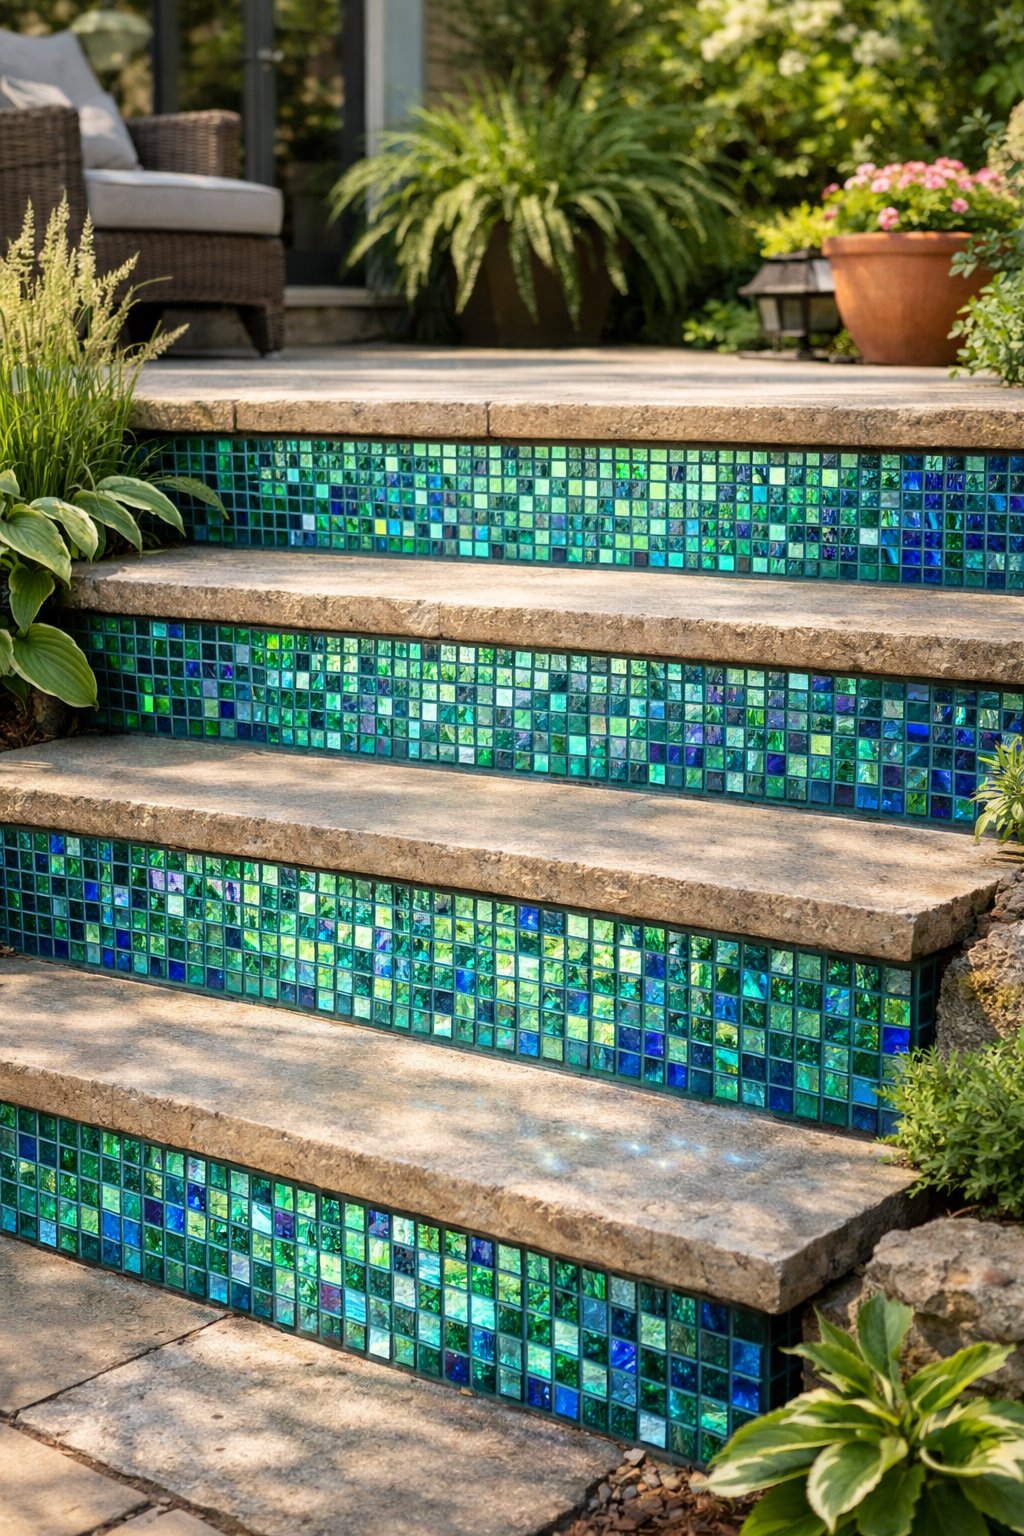
Here’s something cool: recycled glass tiles catch sunlight and moonlight, making your steps twinkle like a pond.
You’re not actually near water, but it sure feels like it.
Pick from a bunch of colors and sizes—mix blues, greens, and neutrals for a wave pattern. These tiles are tough enough for outside if you use the right grout and sealant.
Install them yourself if you’re handy, or call in a pro if you’re not feeling brave. Go for a textured tile face and slip-resistant grout so nobody slides.
Expert Tip From MrPlanter: “Make sure your tiles are rated for outdoor use and seal those edges tight. Mixing blue and green shades gives you that natural, watery look.”
11. Build wide, shallow steps with embedded solar path lights that recharge in daylight and sparkle at dusk
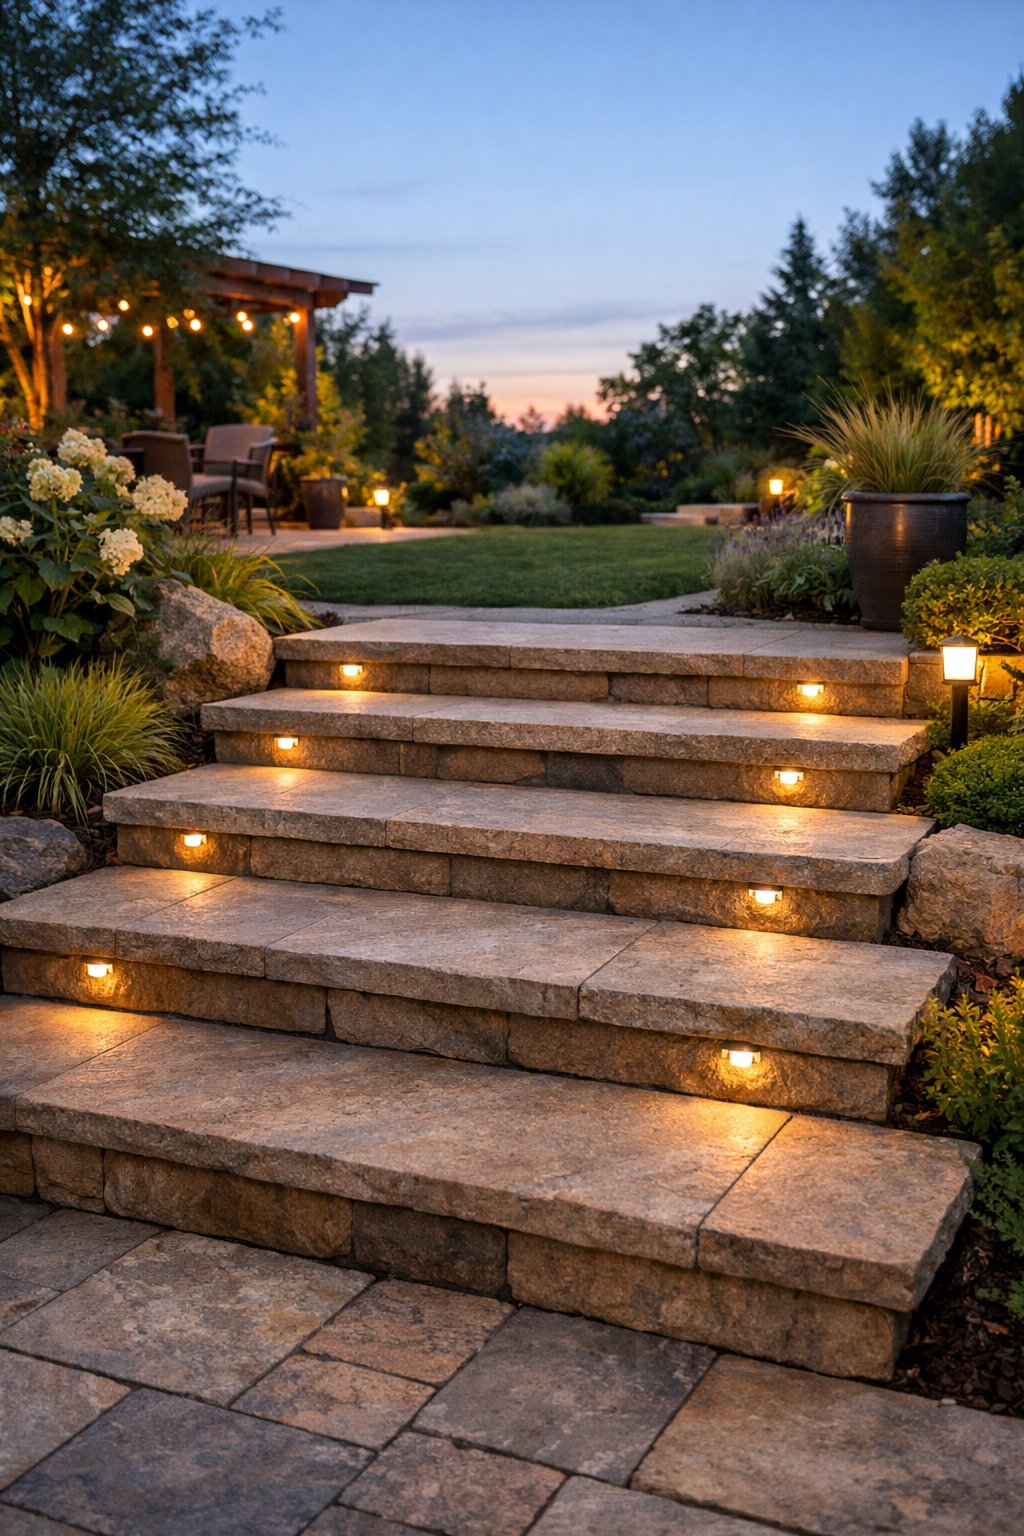
Here’s something you might not expect: wide, shallow steps feel way safer and more welcoming than steep ones.
You get a gentle climb that’s easy on your knees and just looks good.
Make the treads nice and wide so you can walk with a friend or stop to admire your yard. Tuck solar path lights into the risers or along the sides so they charge all day and glow on their own at dusk.
Look for sturdy, weatherproof lights that sit flush so you won’t trip. Warm white LEDs give a soft, friendly shine that makes your steps stand out without blinding anyone.
Expert Tip From MrPlanter: “Pick lights with batteries you can swap out. Test the angle in the afternoon to make sure they actually soak up the sun.”
12. Place a bench integrated into the last step for a perfect spot to overlook your backyard kingdom
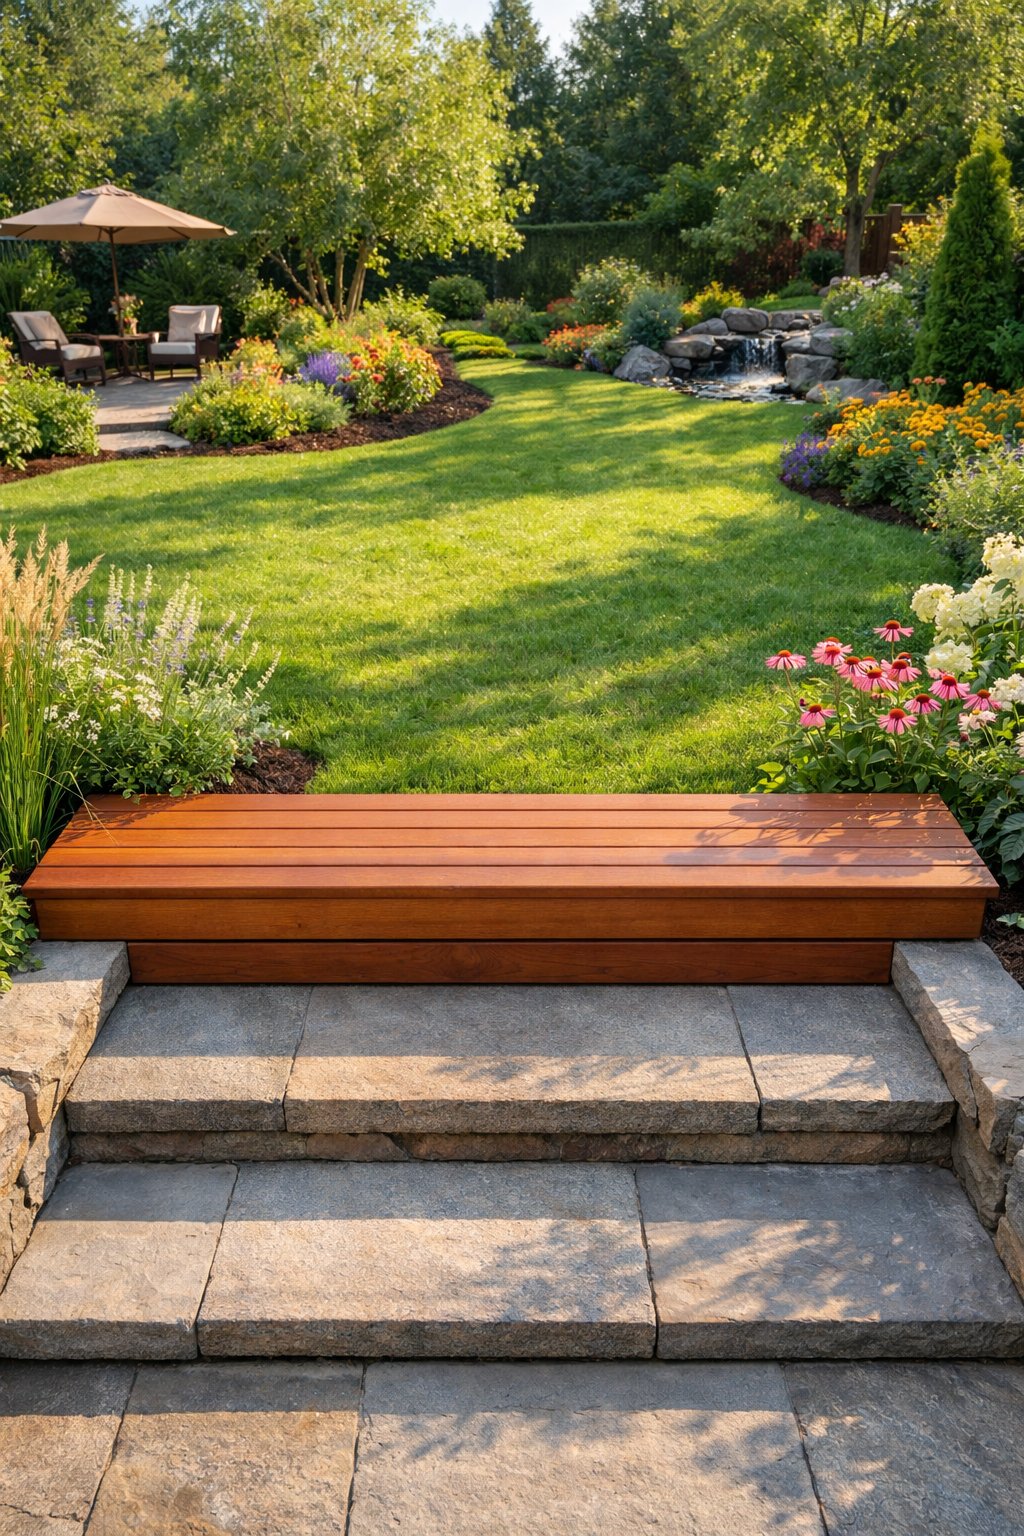
Here’s a wild idea: build a bench right into that final step and suddenly you’ve got a front-row seat to your own backyard show. I mean, why just walk by when you can plop down and actually enjoy the view?
That bench blends in, so it feels like it belongs there—not like you just dragged out a random chair. I like weatherproof wood or stone that matches the steps. It just looks right and holds up when the weather gets weird.
Toss on some cushions for extra comfort. Maybe pop a couple of low planters on the sides to soften things up and add a bit of green.
Keep the bench low and wide so you can sit down and get up without doing gymnastics. If you’re like me and always need more storage, leave a little room under the seat for stashing stuff.
Expert Tip From MrPlanter: “Pick durable materials for the bench and use outdoor-grade cushions to keep it comfy. Add a small planter on one side to bring color and life to the view.”
13. Wrap porch steps in weatherproof outdoor carpet with fun patterns—because who said steps can’t have swagger?
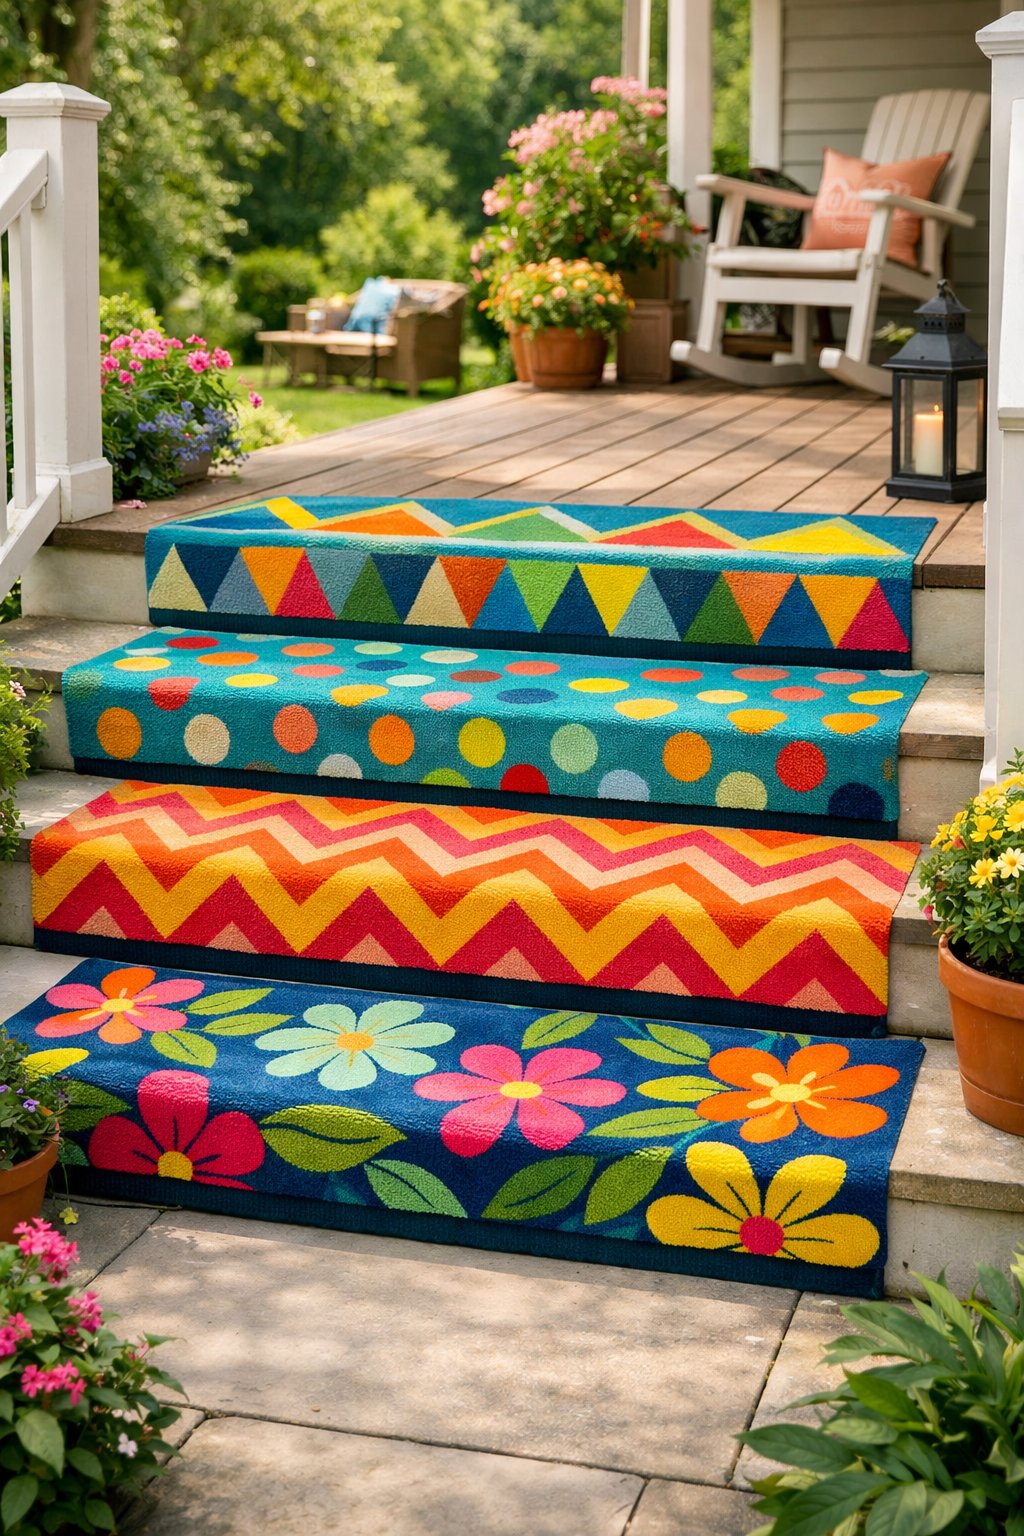
Let’s be honest—plain, slippery steps are a total snooze and kind of a hazard.
I like to jazz things up with weatherproof outdoor carpet. It adds grip and a pop of color. Go for bold stripes, funky geometrics, or even flowers if you’re feeling fancy.
You just measure, cut the carpet, and stick it down with outdoor adhesive or tack strips. It’s not rocket science and it actually makes things safer when it rains.
Cleanup’s a breeze. Sweep, hose, or spot-clean and you’re good to go.
Expert Tip From MrPlanter: “Choose UV-resistant carpet to keep colors from fading, and always test a small patch of adhesive first.”
14. Create mosaic tile risers depicting local flora or fauna as your own backyard tribute art
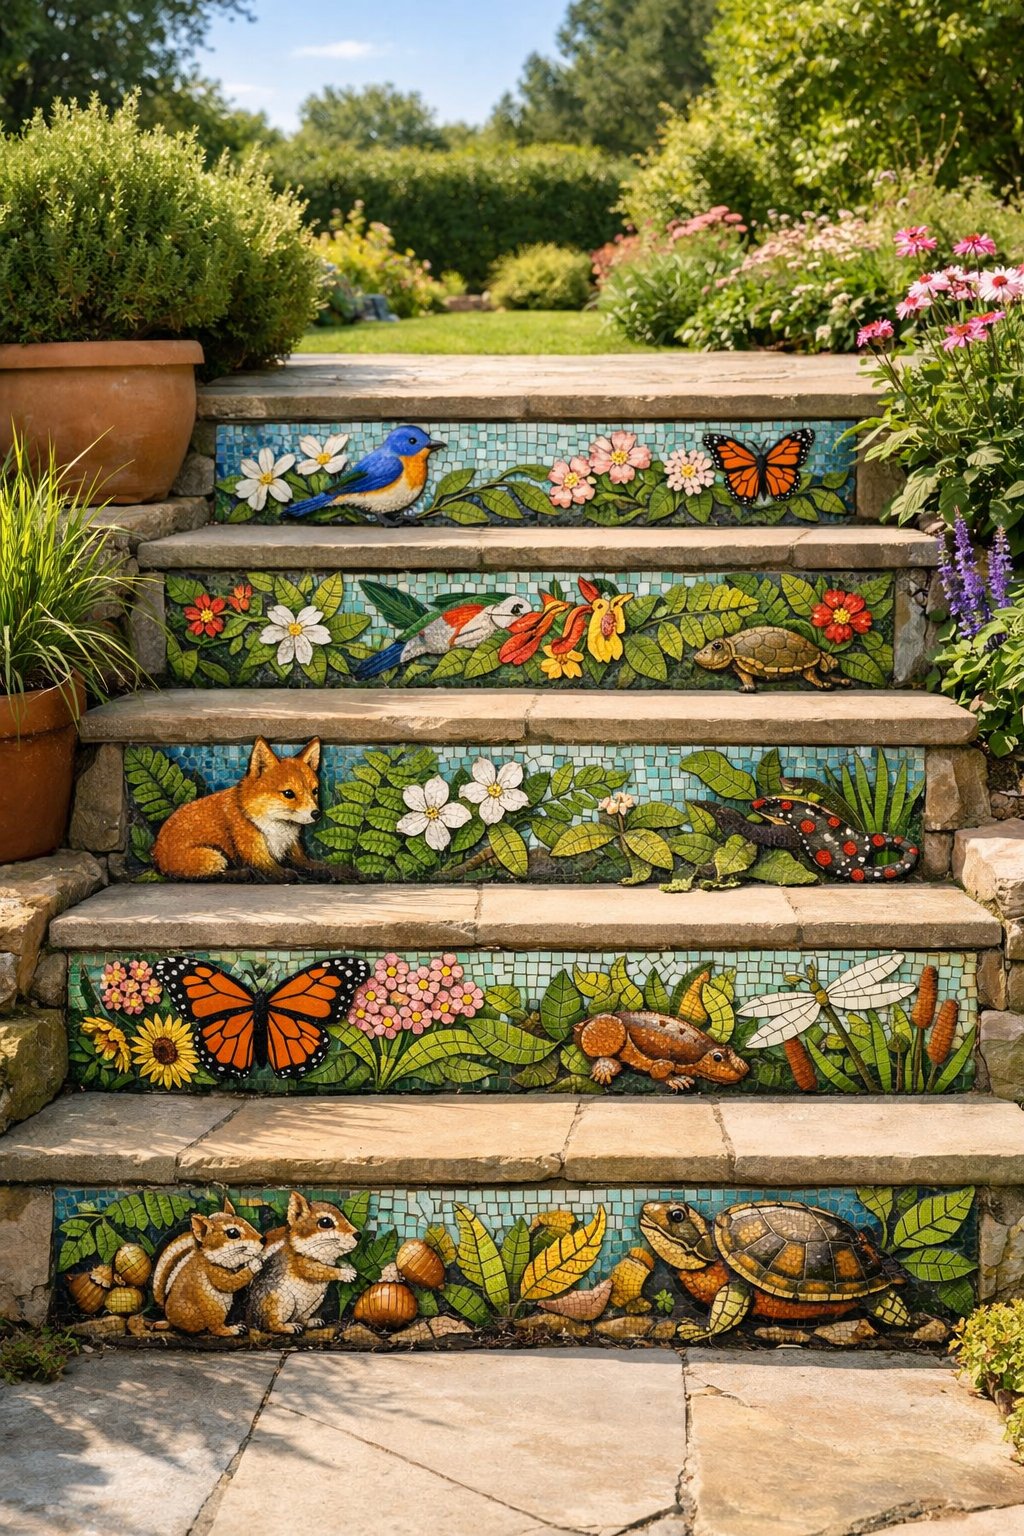
Here’s a quirky one: tiny tiles can actually tell a story. Why not turn your step risers into a mini art gallery showing off the birds or flowers you spot in your yard?
Pick something simple—maybe a sunflower or that one squirrel who thinks he owns the place. Sketch it out for each riser. Use weatherproof tiles or even broken plates and grout that can handle the rain.
Go for bold shapes and bright colors so your masterpiece pops from the sidewalk. It’s slow work, but honestly, it’s pretty satisfying to see your steps come alive.
Expert Tip From MrPlanter: Start with one riser to test colors and grout, then add more as you grow confident. Keep spare tiles of key colors so you can repair chips later.
15. Incorporate hidden drawers under wooden steps for secret snack stashes or gardening gear—because why not?
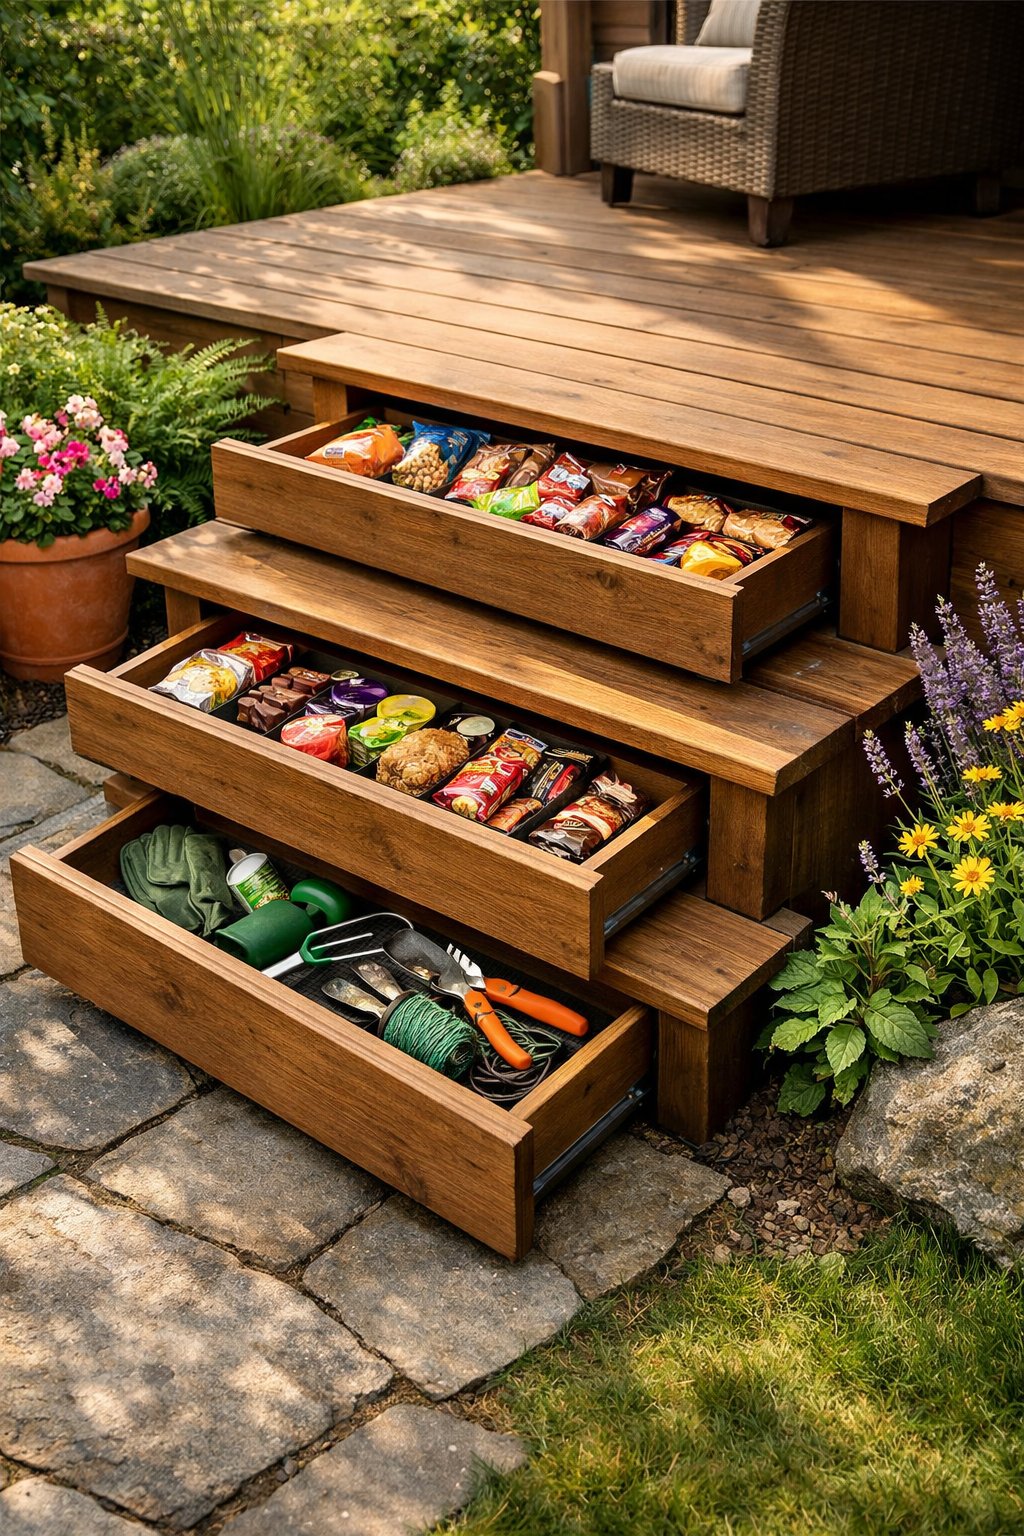
Here’s a fun secret: you can sneak drawers right into the risers of your wooden steps and nobody will ever know.
Hide away seed packets, gloves, snacks for the kids (or, let’s be real, snacks for you). These drawers keep things dry and out of sight, so your porch looks neat and you always know where your stuff is.
Build them shallow for hand tools or deep for boots and pots. I like simple handles or a push-to-open latch—keeps it all tidy and weatherproof.
Make sure you plan for drainage and a snug fit so critters can’t sneak in. Stain or paint the fronts so they blend right in with the rest of the steps.
Expert Tip From MrPlanter: “Measure twice before cutting and test one drawer first to get the fit right. Keep a small silicone seal on the top edge to stop moisture and bugs.”
Choosing Materials for Backyard Steps
Pick stuff that fits your yard’s slope, your style, and how much maintenance you’re actually willing to do. I always think about how tough it is, how slippery it gets, and if it matches my house and garden.
Weather-Resistant Options
Stone and concrete can handle pretty much anything—wet winters, blazing summers, you name it. Granite or bluestone doesn’t mind the cold and won’t crack easily.
Concrete pavers give you a neat, even look and you can seal them to avoid stains. Add some texture or sprinkle on grit so you’re not slipping after every rainstorm.
If you love wood, go for pressure-treated lumber or cedar and keep the boards up off the dirt to slow down rot. Composite decking shrugs off moisture and bugs, but fair warning—it gets toasty in the sun.
Got snow? Round the edges and leave open risers so things melt and you can shovel without cursing. Metal nosing on busy steps protects the edges. A little sealing here and there and you’ll keep everything looking fresh.
Sustainable and Eco-Friendly Picks
Reclaimed bricks and salvaged flagstone give you that old-school charm and cut down on waste. You can usually find old pavers at demolition yards or salvage shops.
Recycled plastic lumber actually looks like wood but won’t rot or need paint. Permeable pavers let rain soak in, so you’re not flooding your flower beds.
Locally quarried stone means less hauling and helps your local suppliers. If you want to keep things low-impact, set steps on packed gravel with some geo-fabric instead of pouring tons of concrete.
Little choices add up—use stainless or galvanized screws so you’re not replacing them all the time. Low-VOC sealers are better for your lungs (and your tomatoes).
Safety and Comfort Considerations
First things first: you want traction, the right step height, a decent handrail, and lights in the right spots. Seriously, a few tweaks—like grippy treads and soft lights—make your steps way safer and more welcoming.
Slip-Proof Solutions
Keep those treads nice and grippy. Stick on non-slip tape, slap on some textured paint, or pop down rubber mats cut to size. If you’ve got stone or concrete, a clear anti-slip sealer works without changing the look.
Try for treads that are 11–12 inches deep and rises that are 6–7 inches high. That’s the sweet spot for most folks.
Put in a sturdy handrail at about 34–38 inches high. One side is good, but both is better if you’re feeling fancy.
Sweep away leaves and moss so things stay safe. In winter, use calcium chloride ice melt—it’s easier on concrete and your plants than regular salt.
Want some flair? Add narrow metal or brass nosing on each step. It looks cool and keeps the edges from wearing down.
Lighting for Night Owls
Let’s be honest—nobody wants to trip on their own porch steps. Light the path, not just the porch. I usually put low-level LED step lights right in the middle of each riser, or sometimes I tuck them into the side walls. That way, you don’t get that blinding glare or weird shadows.
Stick with warm-white LEDs (somewhere around 2700–3000K). They make everything look clear, but still cozy—kind of like a hug for your eyeballs.
If you’re worried about raccoons—or, you know, actual security—motion-sensor floodlights are a solid choice. Dimmable pathway lights are perfect if you’re hosting friends in the evening. Solar lights can do the trick if your yard gets at least 6 hours of sun. But honestly, hardwired LEDs are way more reliable and you can hook them up to timers. Super handy.
Try to keep things spaced out evenly. I usually go with one fixture every 3 to 4 feet, or one per step if your stairs are super tight. Before you commit, grab a flashlight and test your setup at night. Make sure the light lands on the step itself, not straight into your eyes. Trust me, your shins will thank you.